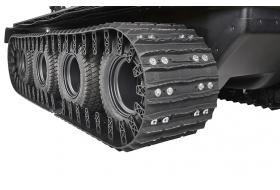
Installing Tracks on Your XTV

Installing Axle Extensions
Axle extensions now come standard, but they need to be added to older models to provide the space needed to fit a set of treads.
1. Lift the vehicle and remove the wheels.
2. Screw the axle extension studs into the hub plate studs. Tighten them down as if they were lug nuts.
3. Slide the axle extension over the studs. The side with the small hole should face away from the hub plate. The extension studs may need to be turned slightly so the sides line up with the slots in the extension.
The wheels can be installed on the extensions and be used with or without tracks fitted.
Track Assembly
It should take 31 full track segments plus one-half segment to wrap a tread around three wheels and 39 segments plus one-half segment to wrap around four wheels.
Join a pair of segments by lining up the holes on the edge. Place a lock bushing in the center gap between the segments. Hammer the track pin through the segment ends and bushing. Add a drop of blue 242 Locktite to the set screw and install the screw in the lock bushing. Make sure this screw is very tight. As you put the track pieces together, alternate the direction of the track pins.
Checking Tire Diameter
Tracks need to be installed around equal size tires to prevent chain windup that can damage the drive system.
With the wheels off of the vehicle, inflate each tire to 10 psi. If the tires are new, or they’ve been aired up to less than 5 psi, they need to sit for at least 24 hours to fully. After this waiting period, recheck the pressure on each tire.
Use a tape measure to measure the circumference of each tire, wrapping the tape around the center of the tread. Sort the tires so that each tread is wrapped around tires that are within ½ inch diameter of each other.
Installation order and direction will depend on your model. On 6 wheel models, put the smallest tire in front and the largest in the back. Install all tires with the tread in the standard orientation. On 8 wheel models, put the smallest on the front hub, followed by the largest, second largest and second smallest tire. Install the middle wheels with the tire treads facing the reverse direction. If measured correctly, the size difference of the tires will always remain the same as long as they’re aired up to the same pressure. If you have issues with chain windup, recheck the tire circumference.
Air up the tires with the following pressures front to back:
6 wheel models — 5 psi, 5 psi and 6 psi
8 wheel models — 5 psi, 7 psi, 7 psi and 6 psi
Installing the Tread
Lay the treads on the ground and drive over them, lining up the vehicle so that two track segments are ahead of the front tires.
Wrap the tread, starting from the back and going over the top of the tires. The front and rear tires can be deflated for easier installation.
Push the ends of the track together and use a locking C-clamp to hold them in place. Install a lock bushing and track pin the same way you did to assemble the tread.
A segment may need to be added or removed to get the right fit depending on tire wear. Once installed, the tracks should have up to one inch of slack on Avenger and Frontier models and two to two-and-a-half inches on all other models. Slack is measured between the track and the bottom of the center tire or tires with the vehicle lifted.
Removing the Track
Use a locking C-clamp to take the tension off of the track. Remove the set screw, then use a hammer and punch to push out the track pin. Remove the C-clamp and pull the track off of the top of the tires. Drive the vehicle off of the track.
Upgrade Your XTV with Help from Shank’s Argo
Want to add a set of tracks to improve your XTV’s off-road performance? You can get the parts and service you need at Shank’s Argo. We’re located at 4900 Molly Pitcher Highway in Chambersburg, PA. To get here from I-80, take Exit 10 to Marion.
